The README is the most important file in your project. It's visitors' first impression, which can significantly impact whether they decide to star, become a user, contributor, or just close the browser tab.
Before open-sourcing our project Daytona — a first for us — I aimed to ensure everything was perfect, aside from the code, which is another story unto itself.
TL;DR
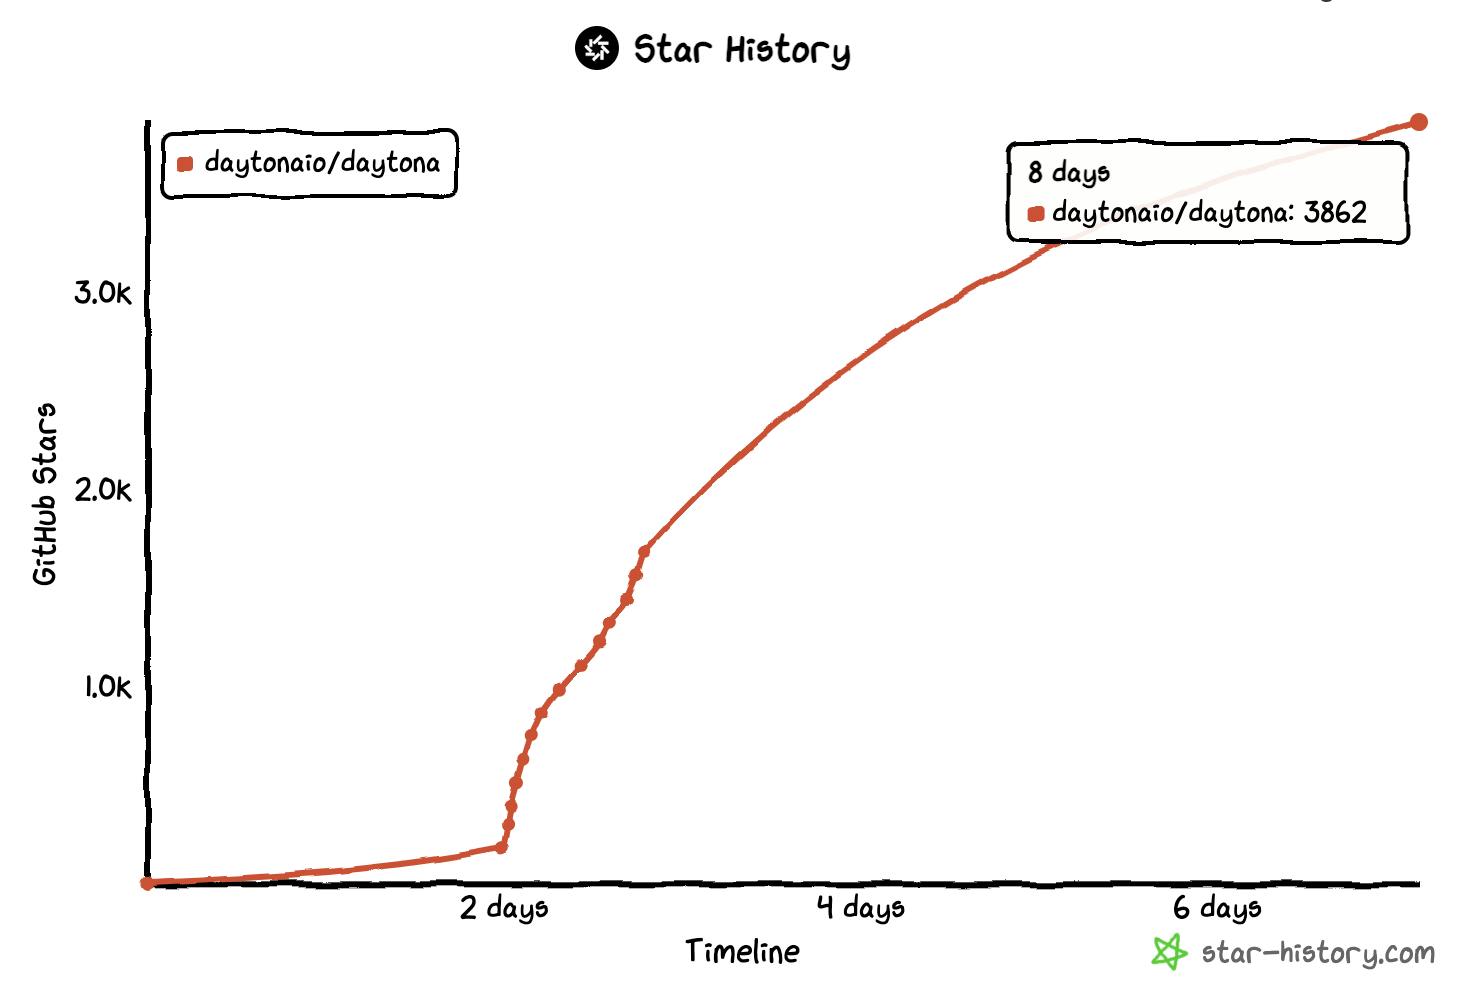
Key strategies for a successful GitHub README learned from the open-source project Daytona that gained 4.000 stars in the first week.
Impactful Header: Logo, badges, one-liner, visuals, and quick start guide.
Engaging Content: Explain the project's purpose, backstory, and detailed getting started guide.
Project Hygiene: Include contributing guide, license, code of conduct, and ensure no broken links or empty sections.
I'm excited to share with you the learnings for crafting README.md that we employed to achieve nearly 4.000 stars in the first week.
I began by examining the 100 most popular repositories on GitHub and was surprisingly underwhelmed by their READMEs. Extending my search to other projects within the same domain yielded similar results. It appears that successful projects often originate from companies or individuals who already have substantial followings, making the basics seem less critical to them. Atlassian's recent "Pragmatic drag and drop" project is a glaring example, a repo with just a readme, yet due to Atlassian’s popularity still got to trending page on GitHub for a day.
However, I decided not to leave anything to chance, so I did extensive research to uncover what truly matters. Here's what I discovered.
Heading Overview
This segment is critical as it captures most readers' attention. Fail to engage them here, and you risk losing them forever. Use this opportunity wisely. Here are my suggestions:
The Logo Beckons
Begin with your project's logo. It may seem obvious, yet many overlook it. This space is valuable real estate for making a strong first impression. In our situation, we decided our initial logo needed a redesign, and after some stress about the timing, we successfully now have a shiny new logo.
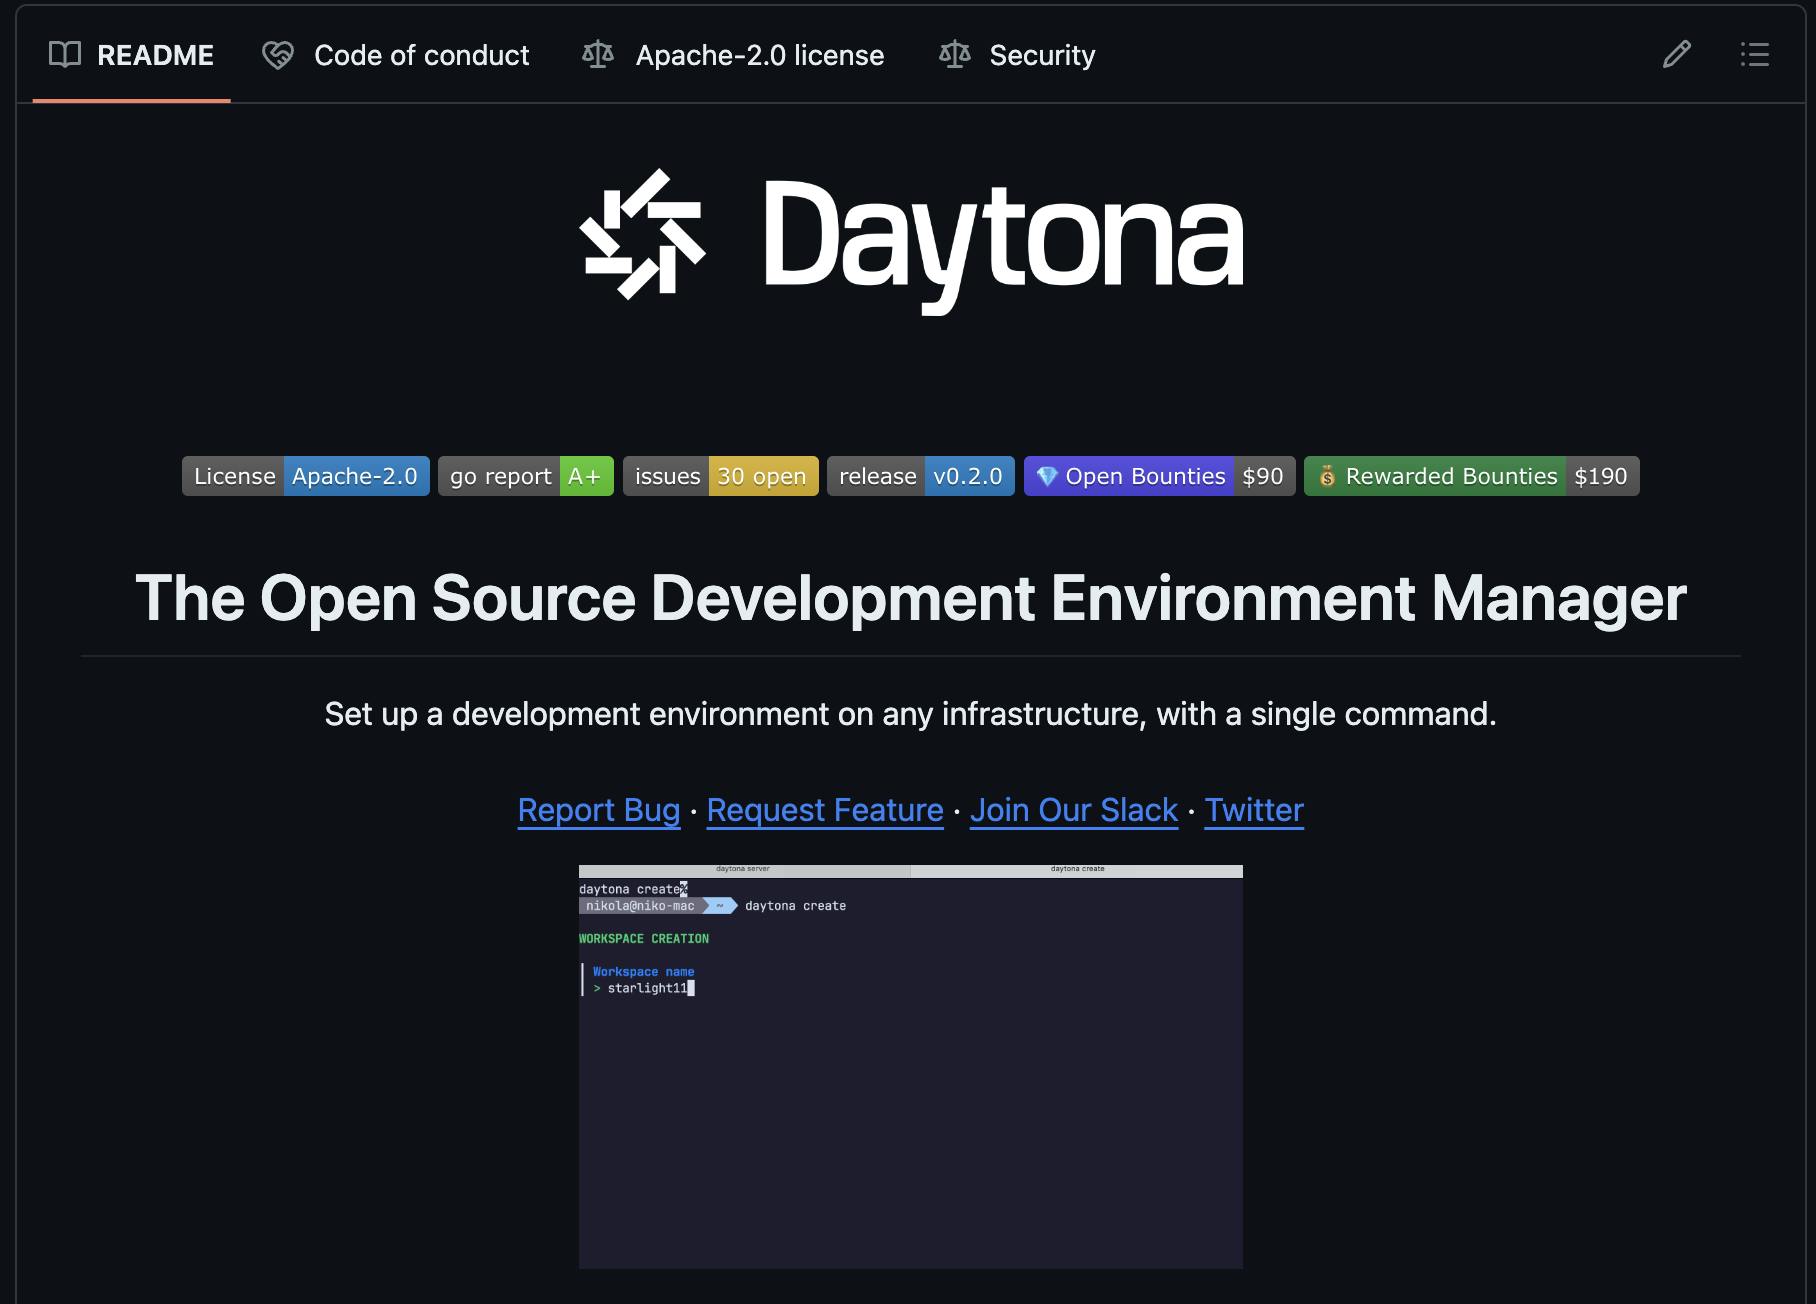
Badges Convey Trust at a Glance
Badges convey vital information about your project's health, build status, and overall quality. Strategically placed beneath your logo, these badges instill confidence in potential contributors, reassuring them that your project adheres to industry best practices.
The Elevator Pitch
Start with a catchy one-liner that encapsulates what your project is about, followed by a subtitle that provides additional context. Craft a concise, one-liner that encapsulates the essence of your project, followed by a compelling sub-title that provides additional context. This initial hook is crucial in piquing the interest of those browsing GitHub's vast repository landscape. Despite dedicating considerable effort to crafting this line, we still feel it misses the mark.
Create A Visual Feast
Humans are inherently visual creatures, and a well-executed image, GIF, or animation can convey the functionality and value of your project more effectively than words alone. Showcase your project's capabilities in a visually captivating manner, leaving a lasting impression on your audience. For this task, LiceCap remains a classic favorite for many, undoubtedly standing the test of time.
Feature Highlights
Once you've captured their attention, it's time to list your project's most compelling features. Highlight the unique value propositions that set your project apart, leaving your audience eager to explore further.
The Quickstart
Provide a quick start guide. Once users have a basic understanding of the project, offer a streamlined guide. With as few commands as possible, show how users can begin utilizing your project.
Main Body of the README
This section is for people seeking further information and more detailed insights; here are the strategies that have proven effective for us.
The Why?
Clarify from the reader's perspective why they should engage with your project. This helps in establishing a connection by directly addressing their needs or challenges.
Backstory
Not every project may have one, but if yours does, it's highly recommended to share it. People are naturally drawn to stories — sharing your motivation and the journey behind the project can make it more relatable and memorable for your audience.
Getting Started
This section is an extended version of the Quick Start guide, where you delve deeper into the how-tos, akin to mini-documents. It's essential for explaining your project's utility and application comprehensively.
Keep it Concise
Avoid unnecessarily long README files, as they can deter users and contributors who may perceive the project as overly complex.
Project Hygiene Essentials
While captivating narratives and visually stunning presentations are essential, true sustainability in the open-source realm hinges on impeccable project hygiene. These fundamental elements serve as the backbone of a thriving, collaborative ecosystem.
Contributing
A well-crafted Contributing Guide ensures that contributors follow your project's best practices, raise useful issues, and submit well-formed pull requests, making it easier for maintainers to manage the project:
Organize Steps: Ensure that the steps for contributing code are clearly organized and easy to follow.
Specific Commands: Use specific commands (e.g., git add <file1> <file2>) instead of greedy commands like git add . to avoid adding unwanted files to commits.
License
Clearly articulate your project's licensing terms, safeguarding both your intellectual property and the rights of contributors. A well-defined license instills confidence and mitigates potential legal complications down the line.
Code of Conduct
A Code of Conduct defines how the project will engage and interact with the community, setting expectations for respectful contributions. While the wording of the Code of Conduct is outside the scope of this article, it's essential to have one in place to ensure a positive and inclusive community.
You can also take inspiration and guidance from the community, for example, our Code of Conduct is adapted from the Contributor Covenant.
The Support Network
Provide clear channels for users and contributors to seek assistance, report issues, or provide feedback. Responsive and accessible support mechanisms not only enhance the user experience but also foster a sense of community and long-term engagement.
Final ReadMe Review Checklist
Ensure every item in the README adds value. Consider moving detailed items to a separate docs folder as the file grows and referencing them in the README. Ensure your README is free from broken links and empty sections, and maintain standardized formatting to achieve a neat and professional appearance.
Maintain consistent naming conventions throughout the README and the repository. Remove empty sections from the README to keep it clean and concise. Create issues with appropriate labels for sections that need content.
Enhancing Project Hygiene Beyond the README
Security
Create a SECURITY.md file in your project's root directory, outlining the process for reporting vulnerabilities.
About
Ensure all sections are completed thoroughly:
Description - Summarize your project in a concise one-liner.
Website - Provide a link for additional information and include relevant topic tags.
On the homepage, include relevant information and deselect any of these three options—Releases, Packages, Deployments—if they're not applicable to save space effectively.
Releases
For Releases, utilize GitHub's releases feature to enable users to gauge the project's activity level based on the most recent release date.
Issues
Custom Labels: GitHub automatically provides default labels, but don't hesitate to create additional ones tailored to your project's needs. Create custom labels such as "Staff Only," "Blocked," "Awaiting Triage," and "Ready for Dev" to categorize issues, manage expectations, and create a triage flow.
Encouraging Community Contributions: At the outset, it's beneficial to populate your repository with several beginner-friendly issues to kickstart community engagement. Use the "good first issue" label to mark these tasks, encouraging new contributors. For example, apply this label to select issues in your project like so: good first issue.
Issue Templates: To ensure that reported issues follow a consistent structure, employing templates is wise. While GitHub offers default templates, customizing them allows for unique and creative approaches to issue reporting.
That's all! While it sounds straightforward, it required substantial research and testing. To see an example, please visit our repository. Additionally, if you have any suggestions, don't hesitate to open an issue - we welcome your input!
Get Daytona from GitHub
Use for free, explore, or fork Daytona, start contributing today, and don't forget to star the repository to stay updated!
Remember, the README is visitors' first impression of your project, so investing time and effort into creating a well-structured and comprehensive file can significantly impact its visibility, adoption, and community engagement.
Gaining traction and accumulating GitHub stars is not a final goal but a
journey, one that requires dedication, responsiveness, and a relentless pursuit of excellence. By meticulously crafting each aspect of your open-source project, from the captivating header to the robust contribution guidelines, you'll create an irresistible gravitational pull that attracts contributors, fosters engagement, and propels your project to the pinnacle of the open-source community.
Best of luck with your project, and here's hoping it becomes a trending success too!