
I've always been excited about the intricacies of the development environment setup. In this article, I will share my insights on standardizing development environments, the role of various standards, and how to choose the most appropriate standard for your projects.
Recently, I had an opportunity to share my knowledge at the Shift conference, a gathering point for tech enthusiasts. My talk, aptly titled "A Deep Dive into Development Environment Configuration Standards," focused on the science of configuring development environments for maximum productivity.
This article is a more detailed exploration of the same topic, drawing from my experiences and insights gained over countless hours of coding, debugging, and deploying applications.
So, let's dive in and unravel the mysteries of the development environment setup together.
Inner and Outer Development Loops: An Overview
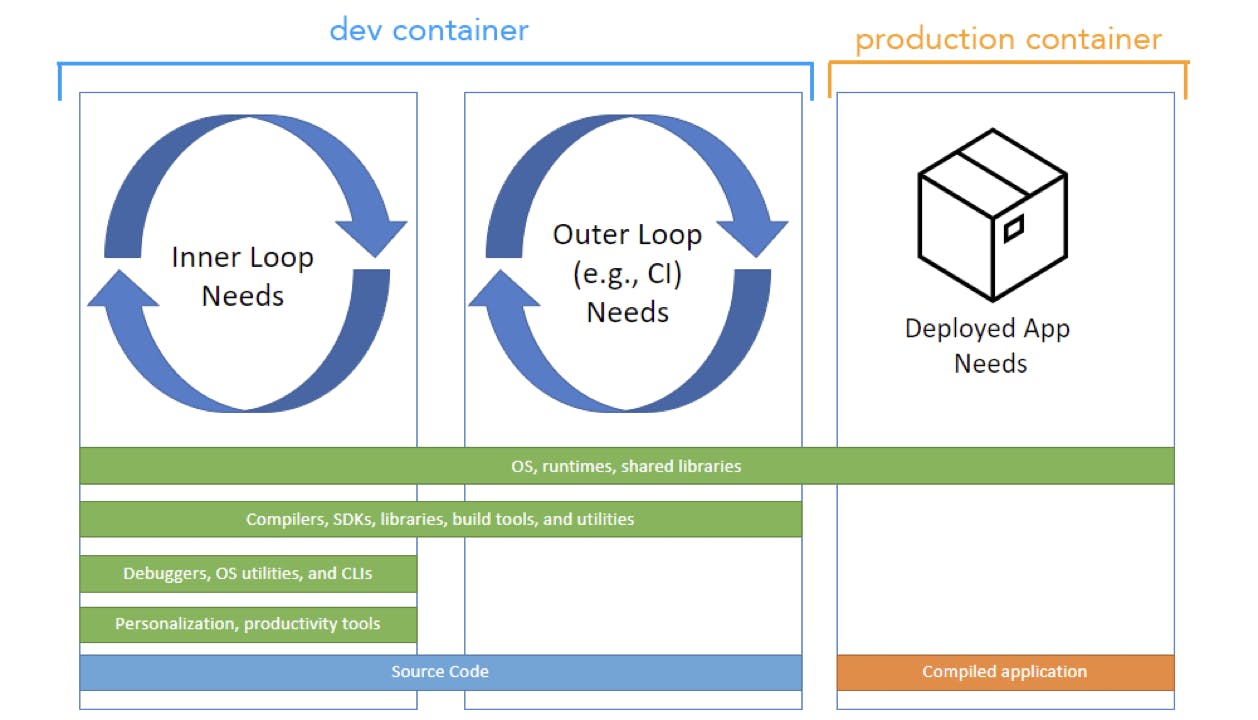
Before we delve deeper into the topic, it's crucial to understand a concept that's gaining momentum in the developer community - the concept of inner and outer loops in development.
Source: https://containers.dev/overview
The inner loop encompasses everything required within our development environments. This includes the project's source code, our preferred tools, support for debugging, OS utilities, and more. Essentially, the inner loop is our personal workspace where we craft our code and bring our ideas to life.
On the other hand, the outer loop extends beyond the direct development process, including elements such as builds running in Continuous Integration (CI) pipelines. The outer loop doesn't require elements like debugging support or Git. Instead, it focuses on the minimum tools necessary to build and package the project for successful deployment.
Today, our primary focus will be on the inner loop, as we aim to standardize development environments. However, introducing the concept of the outer loop helps us understand which development standards cover which part of the loop.
Now, let's dive into the intricacies of development environment configuration standards.
A Glimpse into the Development Environment
"What even is a development environment?" you might ask.
It's the familiar workspace where we, developers, spend most of our time, creating, testing, and refining our code. It's like our personal digital workshop, equipped with our codebase, project libraries, system-wide packages such as Git, curl, zip, and an Integrated Development Environment (IDE) where we craft our code.
The IDE might seem like a given, but it also takes time to configure for a specific tech stack. You need to install extensions, configure settings and even the theme to your liking.
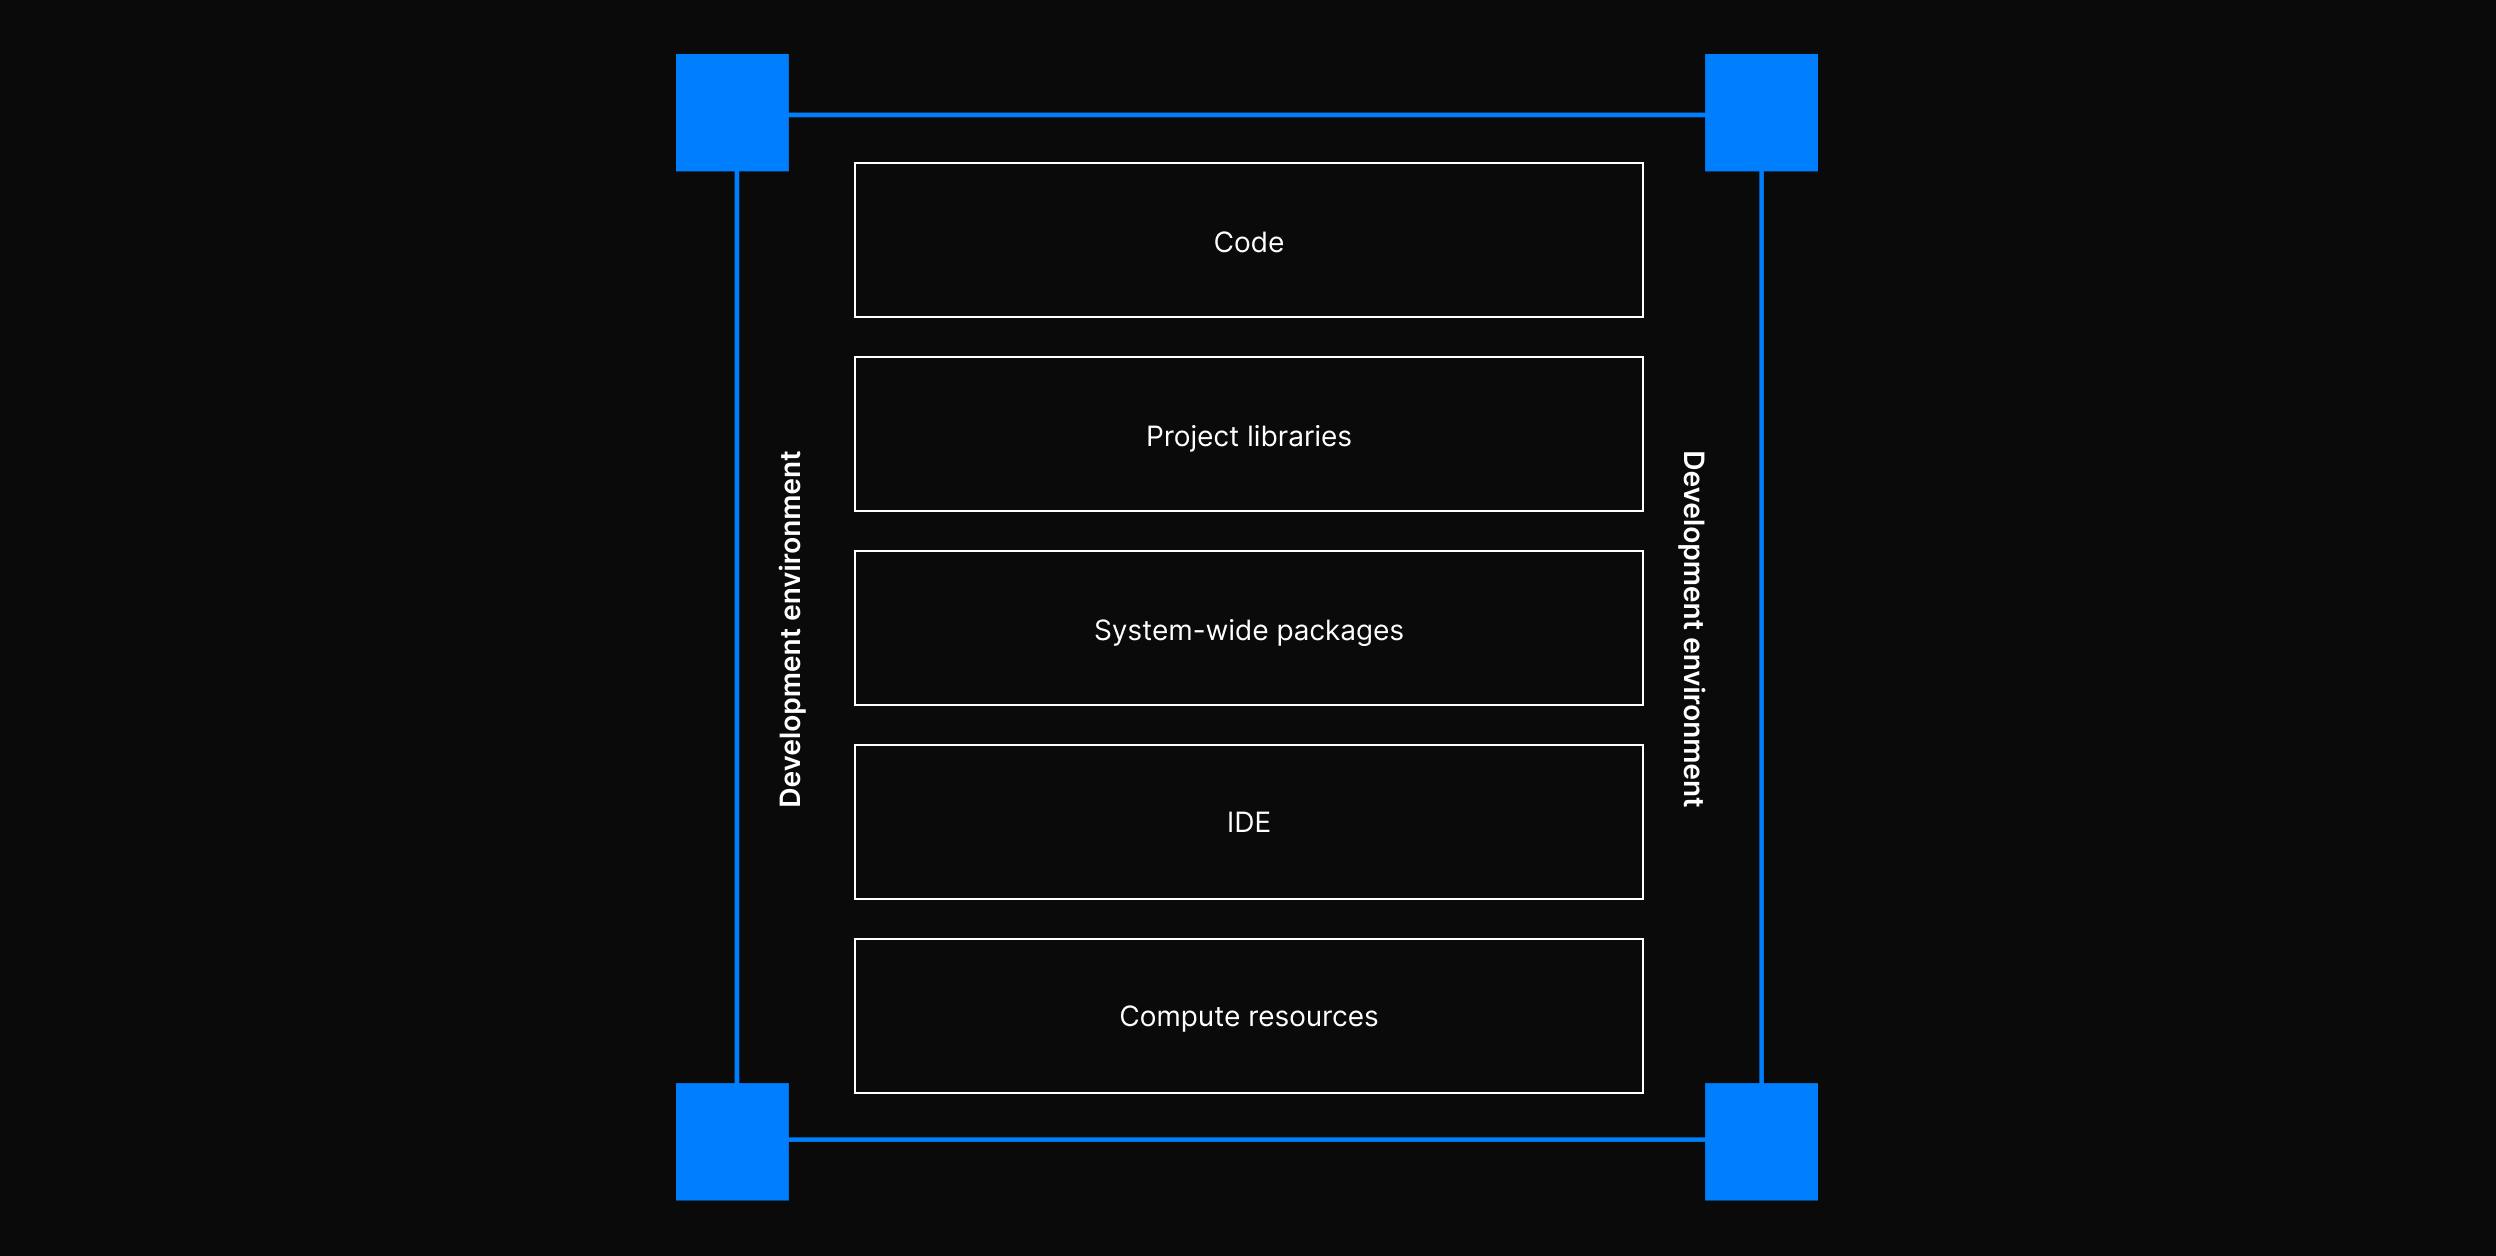
Lastly, we need some computing resources that can handle the project load. Resources like CPU, GPU, and RAM to run our projects. You can see how all of this can be hard to manage, and I know everyone here struggles with dev env configuration very often.
Essentially, the development environment is our personal space where we bring our ideas to life. But, a disorganized and inconsistent environment can significantly hamper our development velocity. This is where standardized development environments (SDEs) come into play.
The Power of Standardized Development Environments (SDEs)
Standardized Development Environments, or SDEs, are the foundation for ensuring consistency across the company's development process. They enable us to share code, collaborate effectively, reduce errors, and most importantly, bring our development velocity to the highest level.
The concept of standardizing system-wide packages, IDE, and compute resources through code is an exhilarating idea. It brings velocity, consistency, security, and cost savings, which are the exact benefits we aim to get with SDEs.
What can SDEs even standardize?
I'll asume your code is already hosted on a git provider like Github or Gitlab and most programming languages have a package manager that handles project dependency standardization. For instance, Node.js has npm and yarn, Java has Maven or Gradle, and C# has NuGet.
Standardization in this case will focus on system-wide packages, the IDE, and the underlying computing resources. The hard part!
Configuring system-wide packages can be particularly challenging and unpleasant. It involves tasks like installing the correct language version, configuring git or any command-line interface (CLI) tool required by our project. Additionally, matching IDE configurations can be tedious. It's easy to forget which extensions were installed or how to configure settings to work with the runtime environment.
Standardizing compute resources is also crucial to ensure a consistent and seamless experience across all our environments.
Understanding the Standards
When we talk about standardization, Docker is the basic standard that most developers are familiar with. Docker is a platform designed to automate application deployments using containers that can function in various environments.
Docker has been widely adopted and was even named the most popular tool in the 2023 StackOverflow survey. This demonstrates the strong appreciation developers have for its ability to standardize workflows.
1FROM ubuntu:20.0423ARG USERNAME=daytona4ARG USER_UID=10005ARG USER_GID=$USER_UID67# Ensure apt is non-interactive to avoid prompt8ENV DEBIAN_FRONTEND=noninteractive910# Install dependencies11RUN apt-get -y update --no-install-recommends \12 && apt-get -y install --no-install-recommends \13 build-essential \14 curl \15 ca-certificates \16 git \17 vim \18 sudo1920# Add Node.js repository21RUN curl -sL https://deb.nodesource.com/setup_12.x | bash -2223# Install Node.js24RUN apt-get -y update --no-install-recommends \25 && apt-get -y install --no-install-recommends nodejs \26 && apt-get autoremove -y \27 && apt-get clean -y2829# Create the user30RUN groupadd --gid $USER_GID $USERNAME \31 && useradd --uid $USER_UID --gid $USER_GID -m $USERNAME3233ENV DEBIAN_FRONTEND=dialog3435USER $USERNAME
Docker allows us to containerize our applications with all the system-wide packages required to run our projects.
1version: '3.7'23services:4 app:5 build:6 context: ..7 dockerfile: .devcontainer/Dockerfile8 environment:9 PORT: 300010 ports:11 - 3000:300012 user: vscode13 command: sleep infinity1415 db:16 image: "postgres:12"17 restart: unless-stopped18 environment:19 - POSTGRES_USER: daytona20 - POSTGRES_PASSWORD: notsecure21 - POSTGRES_DB: devcontainer22 ports:23 - 5432:5432
You can create a Dockerfile that installs all the necessary tools for efficient Node.js app development, including Node.js, git, vim, curl, and other essential development tools. Docker will build a container that can run consistently in any environment, whether local or remote. This way, you and your colleagues can develop inside the container without the hassle of setting up the tools. Using Docker Compose, we can even manage services like databases.
Docker might be a great way to standardize system-wide packages, but what about the IDE and compute resources?
That’s where we can take a look at a couple of standards that are based on containers, Devfile and Dev Containers, that can help with those issues.
The Dev Container Standard
Dev Containers is an open-source solution from Microsoft. They are based on Docker, and you can pretty much do whatever you want in Dev Containers. One thing I absolutely love about Dev Containers is the IDE customizations. It enables us to configure extensions and settings, making the development process even more flexible.
Dev Containers also support features that allow us to extend upon the base configuration of the Docker container. These features can be public or private, and you can even develop your own. Furthermore, Dev Containers cover the compute resources part of the story through minimum host requirements, which take care of CPU, GPU, and memory requirements.
We have covered Dev Containers in our ultimate guide.
The Devfile Standard
On the other hand, Devfile is managed by the Cloud Native Foundation and is an open-source Kubernetes-native API for cloud development workspace configuration. Its primary purpose is to standardize development environments and enable them to run in Kubernetes clusters. This tight-knit relationship with Kubernetes makes Devfile a great choice for developers familiar with Kubernetes.
Devfile allows you to easily write and publish Devfiles, fostering an ecosystem where developers can extend it and create derived Devfiles. This enhances the versatility and adaptability of the development environment.
You can also read more about in our recent comparison of Devfile and Dev Containers.
The Nix Standard
Lastly, we have Nix - a purely functional package manager that allows you to define the environment your project will run in easily. Nix can support declarative and reproducible development environments using its shell.nix file, which is a parallel to the Dev Container and Devfile configuration files.
Essentially, Nix is a secure OS where you can't manage or mutate your package dependencies without mutating the file itself and then rebuilding the entire OS.
Exploring the Dev Container Standard
Dev Containers are an open-source solution with their own Command Line Interface (CLI) tool and various Integrated Development Environment (IDE) integrations.
The configuration file for a Dev Container uses a developer-friendly JSON schema that points to a Docker or Docker Compose file. This configuration file can include additional settings, such as user details and commands to execute immediately after the development environment is created.
1{2 "name": "Rust Hello World",3 "dockerComposeFile": "docker-compose.yml",4 "service": "rust",5 "workspaceFolder": "/workspaces/rust-hello-world",67 "postCreateCommand": "cargo install --path .",8 "remoteUser": "daytona"9}
One of the standout features of Dev Containers is the ability to define all IDE settings and extensions directly in the configuration file. This feature allows for customizations based on where you run the Dev Container. For instance, depending on whether you are working in the browser version of VS Code or JetBrains IDEs, you might want different plugins.
1{2...3 "customizations": {4 "vscode": {5 "settings": {6 "lldb.executable": "/usr/bin/lldb",7 "files .watcherExclude": {8 "**/target/**": true9 }10 },11 "rust-analyzer.checkOnSave.command": "clippy"12 },13 "extensions": ["eamido.gitlens"]14 }15...16}
Dev Containers also bring to the table the concept of 'Features.'
1{2 ...3 "features": {4 "ghcr.io/devcontainers/features/common-utils:1": {5 "installZsh": "true",6 "username": "daytona",7 "uid": "1000",8 "gid": "1000",9 "upgradePackages": "true"10 },11 "ghcr.io/devcontainers/features/rust:1": "latest"12 },13 ...14}
Features allow developers to add extra capabilities to the underlying container image. Suppose you need to enable a specific programming language inside your container, like Rust. In that case, you can include that as a feature in your configuration. Furthermore, Dev Container lets you define host resource requirements for CPU, memory, storage, and GPU, thus standardizing the provisioning of compute resources.
1{2 ...3 "hostRequirements": {4 "cpu": 2,5 "memory": "4gb",6 "storage": "32gb",7 "gpu": "true"8 },9 ...10}
The integration of Dev Container with popular IDEs like VS Code and JetBrains is another advantage.
Source: https://code.visualstudio.com/docs/devcontainers/create-dev-container
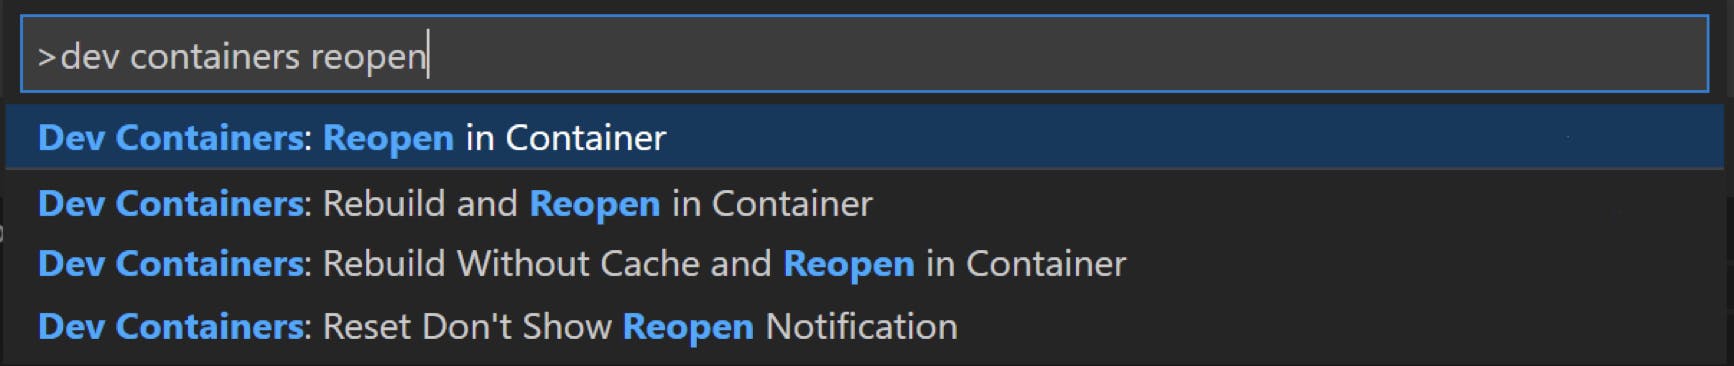
With the help of an extension for these editors, you can spin up a local development environment standardized according to the configuration file you defined. Once built, you can list your Dev Container and attach VS Code to any of them. You can also view logs, stop the containers, and so on.
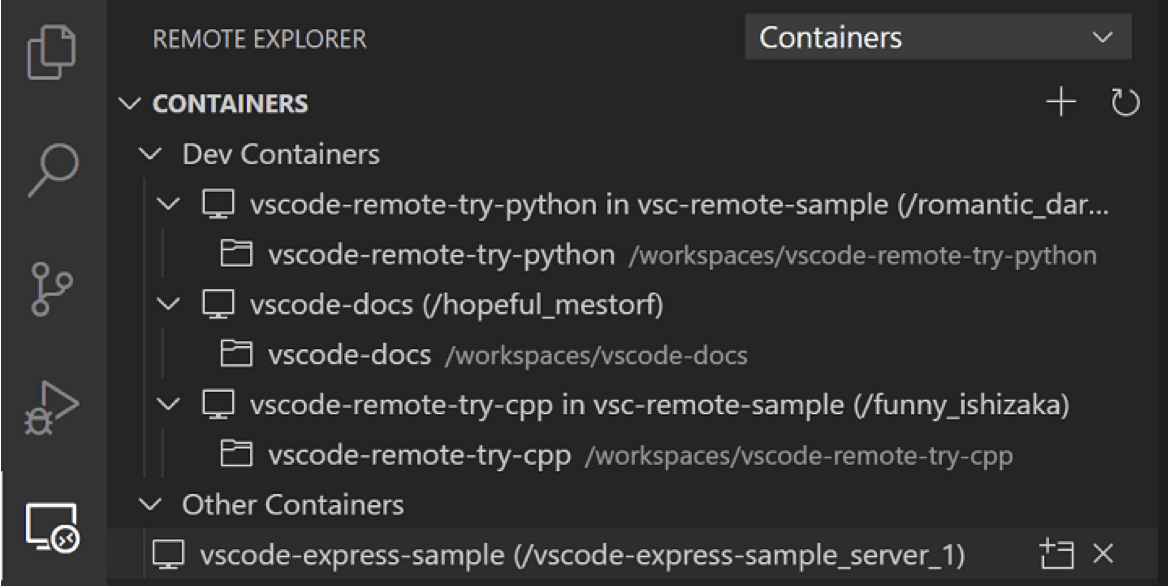
Source: https://code.visualstudio.com/docs/devcontainers/create-dev-container
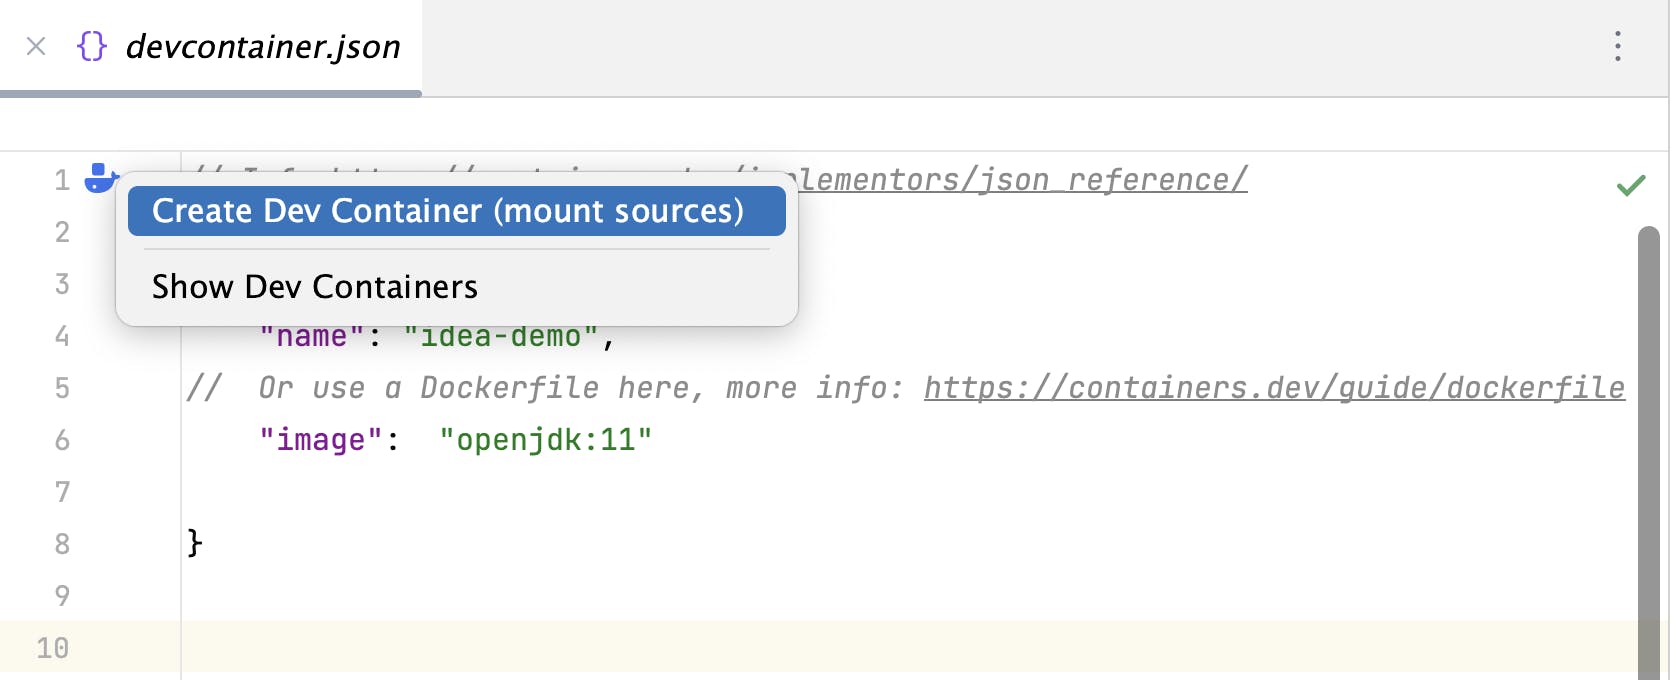
For JetBrains users, there is an extension that provides an easy option to create the Dev Container when selecting the devcontainer.json file.
Source: https://code.visualstudio.com/docs/devcontainers/create-dev-container
In summary, Dev Container is an open-source, container-based standard with excellent IDE integration. They are relatively easy to adopt, particularly if your application is already containerized.
Delving into the Devfile Standard
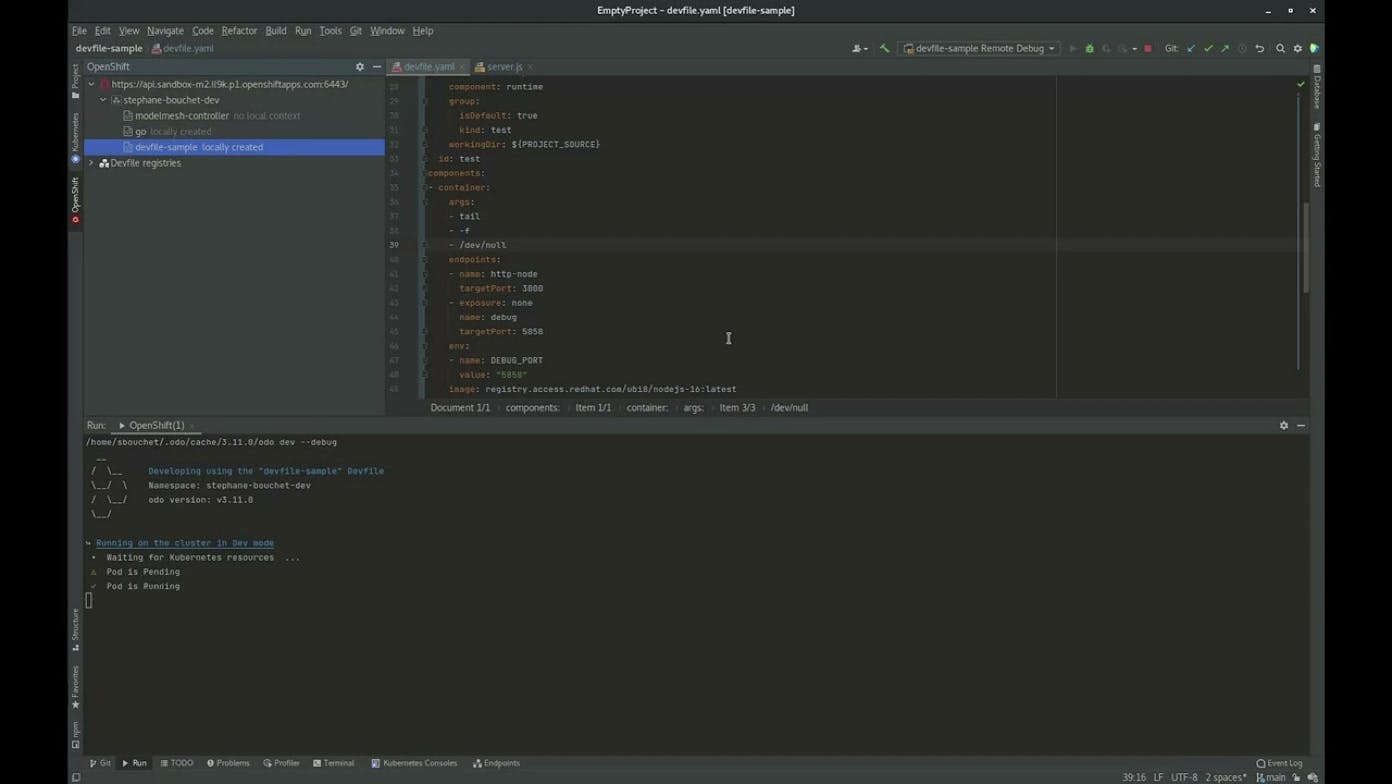
Devfile makes use of a YAML file for its specifications and operates on a container-based system. A review of the Devfile documentation reveals that it identifies as a Kubernetes-native API tailored for configuring cloud development workspaces. In simpler terms, Devfile is best suited for developers planning to deploy their applications using Kubernetes. However, this doesn't exclude its usage for non-Kubernetes projects. It simply suggests that Kube-native projects can utilize all that Devfile has to offer.
1schemaVersion: 2.2.02metadata:3 name: go4 language: go5components:6 - container:7 endpoints:8 - name: http9 targetPort: 808010 image: quay.io/devfile/golang:latest11 memoryLimit: 1024Mi12 mountSources: true13 name: runtime
Devfile advocates its ecosystem as one of the key features of the standard. It allows you to easily write and publish Devfiles to public or private registries which can then be used in other projects.

Source: Devfile.io
Devfile, an open-source Kubernetes-native API, offers a unique feature: the ability to derive from existing Devfiles by referencing them as parents. This capability enhances the composability and extensibility of Devfiles, making them remarkably developer-friendly.
1schemaVersion: 2.2.02metadata:3 name: my-project-dev4parent:5 id: nodejs6 registryUrl: https://registry.devfioe.io/7 version: 2.0.0
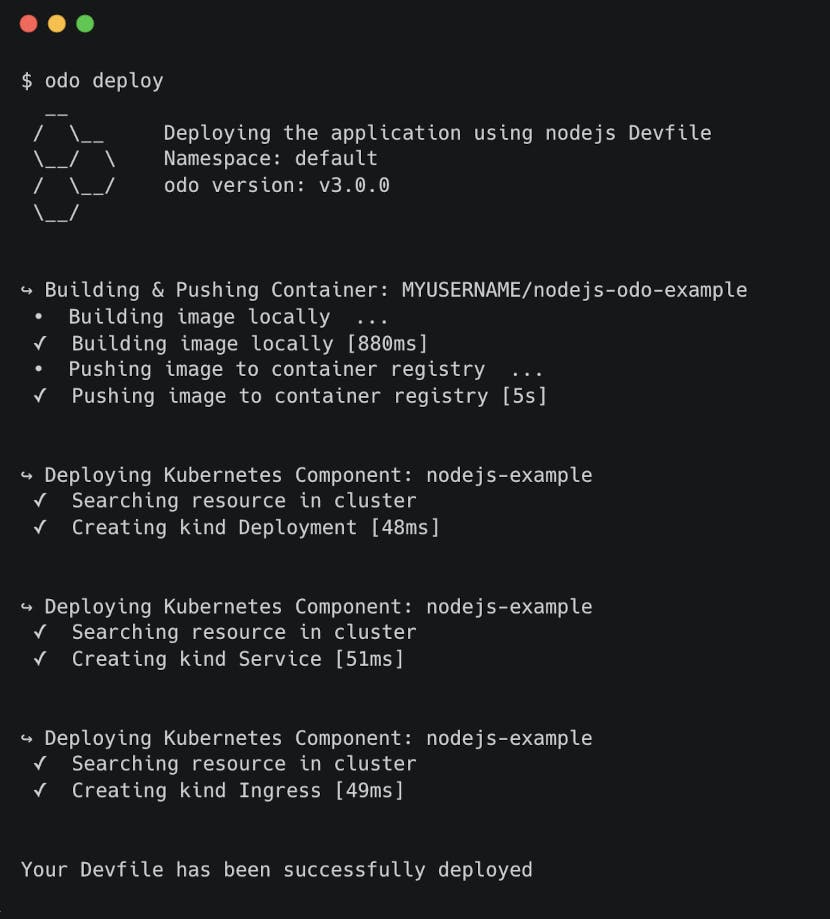
One standout tool in the Devfile ecosystem is 'odo.' This Devfile CLI tool allows you to develop, debug, and deploy your container-based projects, with an initialization command that helps you create a Devfile for your project. What sets odo apart is its inherent support for the inner and outer loop development flow.
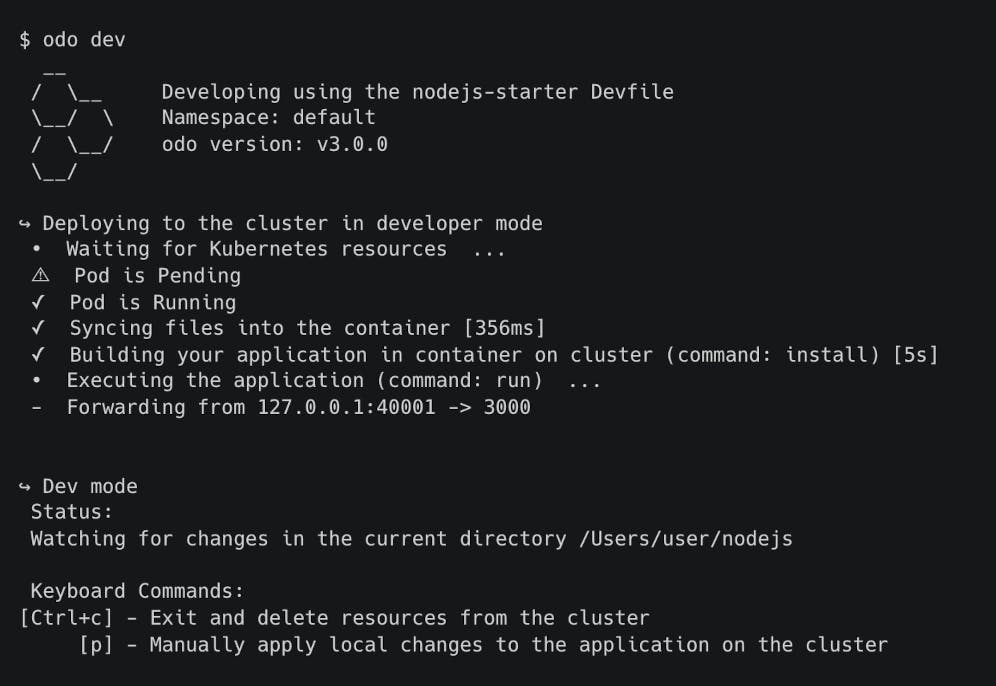
The 'odo dev' command initiates the project in development mode, catering to the inner loop of development. This mode enables you to develop and debug your application pre-deployment. Once you're ready to deploy, the 'odo deploy' command aligns with the outer loop functionality, deploying your application as specified in the Devfile. This comprehensive approach positions odo as a versatile tool for the Devfile standard.
The OpenShift Toolkit can be used to create and manage your Kubernetes workspaces, configure registries, and create Devfiles for your projects. This toolkit utilizes odo in the backend to manage all processes, further cementing odo's position at the top of the Devfile toolchain. It also features a JetBrains plugin for added convenience.
A striking aspect of the Devfile specification is its deep integration with Kubernetes. It allows you complete control over the Kubernetes resources created, enabling you to write manifests directly into the file that will be applied to your cluster. This makes Devfiles particularly appealing to developers already familiar with Kubernetes and those seeking maximum control over the resources of a development environment.
1components:2 - name: myk8deploy3 kubernetes:4 inlined:5 apiVersion: batch/v16 kind: Job7 metadata:8 name: pi9 spec:10 template:11 spec:12 containers:13 - name: job14 image: myimage15 command: ["some", "command"]16 restartPolicy: Never
Devfile is natively supported in Eclipse Che and OpenShift, allowing you to standardize your development environments on these platforms today.
In summary, Devfiles are open-source and Kubernetes-native, making them ideal for teams already incorporating Kubernetes into their workflows. They boast a robust ecosystem that supports pushing and using Devfiles from public and private registries. Furthermore, their design leans into the inner and outer loop story, particularly with the odo CLI tool.
Unpacking the Nix Standard
Nix, a purely functional package manager, treats packages as immutable values in a functional programming language, similar to Haskell. Once a package is built, it remains unchanged, and the build process must occur in complete isolation. The name of a Nix package includes a cryptographic hash, representative of the package's build dependency graph. If any dependencies change, a new package is built, ensuring all package dependencies are part of the build process. This effectively eliminates the “it works on my machine” problem and ensures that a Nix package contains everything needed for its runtime.
1/nix/store/b6gvzjyb2pg0kjfwrjmg1vfhh54ad73z-firefox-33.1/
Nix also allows the creation of 'ad hoc shell environments.' With just one command, you can enter a shell equipped with git, neovim, and Node.js, for instance. This functionality lets you test your code in various environments.
1nix-shell -p git neovim nodejs
But to qualify as a development environment standard, Nix uses a shell.nix file where you can define any system-wide package dependencies your project needs.
1{ pkgs }: {2 deps = [3 pkgs.nodejs-204 pkgs.nodePackages.typescript-language-server5 pkgs.yarn6 pkgs.git7 ];8}
You can also compose shell configurations from multiple files for better reusability. This allows you to reuse configs from other projects, or maybe have a library of nix configurations that you manage centrally in your team and then just import it in different projects.
1(import ./default.nix).shell
But the true game-changer is NixOS, an operating system based on Nix that allows the entire OS to be defined as a set of Nix files. This guarantees standardization at the operating system level.
NixOS is designed to be standardized and reproducible from the very beginning. Everything about the OS, from the boot loader and filesystem to packages, is written as Nix expressions. This ensures that everything in the OS is immutable and more secure.
1{2 boot.loader.grub.device = "/dev/sda";3 fileSystem."/".device = "/dev/sda1";4 services.sshd.enable = true;5}
This means that everything in the OS is immutable and more secure than a standard Linux OS for example. To modify something on the OS level, like inserting a malicious service or package, is not possible without modifying the nix configuration and then rebuilding the entire OS.
1nixos-rebuild switch
Updates are executed atomically through the CLI tool, ensuring you never end up in an unusable state. If a rebuild fails, you're automatically reverted to the last consistent state with zero downtime. This also makes rollbacks easy, as each OS rebuild is stored as a separate version of the OS.
1nixos-rebuild switch --rollback
In summary, Nix and NixOS are open-source standards that provide a functional package manager, solving the “it works on my machine” problem. They offer a secure OS design due to the immutability of all installed packages, and their atomic upgrades make OS updates less stressful.
If you want to learn more about it, I recommend going to their docs and taking a look.
How to Choose the Right Standard?
After discussing Dev Container, Devfile, Nix, and NixOS, the next critical step is determining which standard best fits your project.
This decision will ultimately depend on your specific requirements and how each standard can optimize your Development Velocity.
The choice of standard largely depends on your project requirements. To streamline this choice, here is a table that outlines which standard possesses certain features.
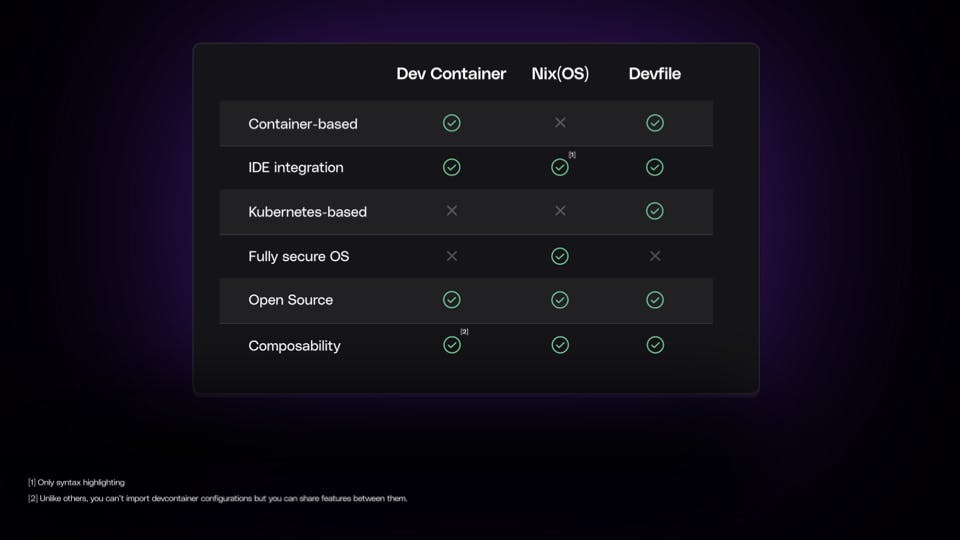
For instance, if your application is already containerized and you're seeking robust integrations with VS Code, both Dev Containers and Devfiles could be ideal choices.
If your project requires JetBrains or VS Code integrations, Dev Containers and Devfile with Odo are good choices.
If your project is closely tied to Kubernetes, Devfile might be the more obvious choice due to its native Kubernetes support.
Alternatively, if you're prioritizing OS-level security for your entire team, NixOS could be the route.
Choosing the Right Standard for Your Project
It's crucial to note that there's no one-size-fits-all solution when it comes to choosing a standard.
The key lies not in the specific standard chosen, but in understanding how that standard operates. By implementing a suitable standard, you can save countless hours typically spent setting up and securing your environment.
Remember, the goal is to enhance your Development Velocity, irrespective of the standard chosen.
Choose whatever you want, but get the benefits of SDEs.
At Daytona, we aim to support all the standards, starting with Dev Container. Daytona can be easily installed into the company network and provides a scalable and secure out-of-the-box solution.
Daytona stands out as an vendor-neutral enterprise alternative to GitHub Codespaces. Daytona enables software development teams to use their preferred tools and services regardless of hosting provider or code repository.
Because of this adaptability, teams can leverage existing infrastructure investments and workflows while avoiding vendor lock-in and remaining truly vendor-agnostic.

