Build a Coding Agent Using OpenCode SDK and Daytona
This guide walks you through running the OpenCode autonomous coding agent inside a secure Daytona sandbox. The OpenCode server runs fully isolated in the sandbox and the script connects to the server using the OpenCode SDK.
The agent can develop full-stack web apps, write code in any language, install dependencies, and run scripts. It can also start and manage dev servers, and generate preview links for live apps.
1. Workflow Overview
Section titled “1. Workflow Overview”When you run the script, it creates a Daytona sandbox, installs OpenCode, and starts the OpenCode server inside the sandbox. You send prompts and see responses in your terminal. On exit, the sandbox is deleted.
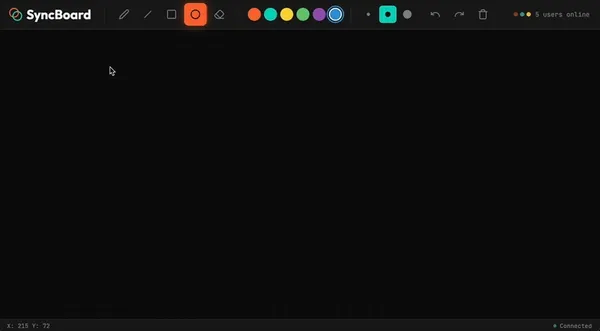
$ npm run startCreating sandbox...Installing OpenCode in sandbox...Preview: https://4096-0626a08c-08e7-4fbe-9799-d160bac66b08.daytonaproxy01.netPress Ctrl+C at any time to exit.User: Create a minimalist collaborative whiteboard appThinking...🔨 ✓ Run: Check current directory structure✓ 3 todos📝 Add home/daytona/SPEC.md✓ 2 todos📝 Add home/daytona/index.html✓ 1 todos✓ home/daytona/SPEC.md✓ https://fonts.googleapis.com/css2?family=JetBrains+Mono:wght@400;500&family=Outfit:wght@400;500;700&display=swap (text/css; charset=utf-8)✓ home/daytona/index.html🔨 ✓ Run: List files in directory🔨 ✓ Run: Start HTTP server for whiteboard🔨 ✓ Run: Check if server is running✓ 0 todosYour minimalist collaborative whiteboard app is ready!
**Preview URL:** https://8080-0626a08c-08e7-4fbe-9799-d160bac66b08.daytonaproxy01.net
## SyncBoard - Features
**Drawing Tools:**- Pencil (freehand drawing)- Line, Rectangle, Ellipse (shape tools with preview)- Eraser (removes intersecting strokes)
**Customization:**- 6 vibrant color presets- 3 stroke widths (thin/medium/thick)- Keyboard shortcuts: `P` `L` `R` `E` `X` for tools, `1` `2` `3` for stroke widths
**Collaboration:**- Simulated real-time collaboration with other users- Unique user colors for each participant- Auto-saves to localStorage every 2 seconds
**Actions:**- Undo/Redo (stores 20 actions, Ctrl+Z / Ctrl+Shift+Z)- Clear canvas (with confirmation dialog)- Coordinates display in status bar
**Design:**- Dark theme with coral/teal accents- Dot grid background pattern- Smooth animations and hover effects- Responsive layout for mobile devices
User:Cleaning up...
When your task involves running or previewing a web application, the agent can host the app and generate a preview link for you to inspect the live result:
You can continue interacting with your agent until you are finished. When you exit the program, the sandbox will be deleted automatically.
2. Project Setup
Section titled “2. Project Setup”Clone the Repository
Section titled “Clone the Repository”First, clone the Daytona repository and navigate to the OpenCode SDK example:
git clone https://github.com/daytona/guides.gitcd guides/typescript/opencode/opencode-sdkConfigure Environment
Section titled “Configure Environment”Get your API key from the Daytona Dashboard.
Copy .env.example to .env and add your key:
DAYTONA_API_KEY=your_daytona_keyLocal Usage
Section titled “Local Usage”Install dependencies and run the example:
npm installnpm run startThe agent will start and wait for your prompt.
3. Understanding the Script
Section titled “3. Understanding the Script”OpenCode uses a client-server model: The server manages coding agents, sessions and configuration. Clients communicate with the server over HTTP to run prompts in sessions and receive streamed responses.
Initialization
Section titled “Initialization”On startup, the script:
- Creates a new Daytona sandbox.
- Installs OpenCode globally in the sandbox.
- Starts the OpenCode server in the sandbox.
- Gets the preview URL for the server and creates a client with that base URL.
- Enters the readline loop to send prompts to the server and receive streamed responses.
- On Ctrl+C, deletes the sandbox and exits.
OpenCode Server
Section titled “OpenCode Server”The OpenCode server runs inside the sandbox and handles all agent work: LLM calls, tools (bash, write, etc.), and code execution. The script starts it with:
const envVar = injectEnvVar('OPENCODE_CONFIG_CONTENT', opencodeConfig)const command = await sandbox.process.executeSessionCommand(sessionId, { command: `${envVar} opencode serve --port ${PORT} --hostname ${HOSTNAME}`, runAsync: true,})A custom configuration is injected which includes a system prompt. The system prompt tells the agent it runs in a sandbox, to use /home/daytona for file operations, and the preview URL pattern so it can provide correct preview links.
OpenCode Client
Section titled “OpenCode Client”The client runs on your machine and talks to the server using the OpenCode SDK. Session.create sets up the SDK client and subscribes to the event stream so the client can show tool activity (e.g. “✓ Run: …”, “📝 Add …”) as the agent works:
const client = createOpencodeClient({ baseUrl })const sessionRes = await client.session.create({ body: { title: 'Daytona query' } })const sessionId = sessionRes.data?.idif (!sessionId) throw new Error('Failed to create OpenCode session:' + sessionRes.error)const events = await client.event.subscribe()To send a prompt, the client calls session.prompt and processes events from the existing stream to show tool activity:
const promptPromise = this.client.session.prompt({  path: { id: this.sessionId },  body: { parts: [{ type: 'text', text: query } satisfies TextPartInput] },})
for await (const event of takeUntil(this.events.stream, promptPromise)) {  printEvent(this.sessionId, event)}
Main loop
Section titled “Main loop”When the server is ready, the script creates a session and runs a readline loop:
const session = await Session.create(baseUrl)const rl = readline.createInterface({ input: process.stdin, output: process.stdout })
while (true) {  const query = await new Promise<string>((resolve) => rl.question('User: ', resolve))  if (!query.trim()) continue  await session.runQuery(query)}
The readline loop waits for user input, sends it to the agent, and prints the response.
Key advantages:
- Secure, isolated execution in Daytona sandboxes
- OpenCode SDK client in your terminal; server runs in the sandbox
- Support for 75+ LLM providers
- All agent code execution happens inside the sandbox
- Automatic preview link generation for deployed services
- Custom agent configuration for Daytona-specific workflows