In this step-by-step guide, we'll walk you through the process of setting up Daytona with a remote machine. Daytona is a powerful tool for creating and managing development environments on local or remote machines.
In this example, we'll use an Azure ARM machine with 8 vCPUs, 16 GB of RAM, and 300 GB of storage. You can play around with different server specifications or utilize whatever is accessible to you, maybe a homelab machine or that server you have tucked away in a corner. This will affect the number of workspaces you can have concurrently and the overall user experience.
TL;DR
Prepare Remote Machine: Install Docker and set permissions.
Configure Daytona Target: Add a remote machine as a target in Daytona.
Integrate Git Providers (Optional): Add GitHub or other providers to Daytona.
Create and Access Workspace: Use Daytona to create and open a workspace in VS Code.
Prerequisites:
Daytona daemon running on a local machine
A remote machine with Docker installed
SSH access to the remote machine
A GitHub account with a personal access token
Note
Please note that the open-source Daytona software is still in its alpha stage, so it is important to be cautious of potential code changes that may cause disruptions. It is recommended to always update to the latest version. This guide was created using Daytona v0.12.1.
Step 0: Set Up Daytona on Your Local Machine
Before you can start using Daytona with a remote machine, you need to ensure that Daytona is properly set up on your local machine. If you haven't installed Daytona yet, don't worry! We've got you covered with a simple one-liner that will get you up and running in no time.
Installing Daytona
To install Daytona on your local machine, open a terminal and run the following command:
1(curl -sf -L https://download.daytona.io/daytona/install.sh | sudo bash) && daytona server -d
This command will download the Daytona installation script from the official Daytona website and execute it using sudo privileges. The script will guide you through the installation process, ensuring that all the necessary dependencies are installed and configured correctly.
Starting the Daytona Server
Once the installation is complete, the command will automatically start the Daytona server in the background using the -d flag. This means that you can continue using your terminal for other tasks while Daytona runs in the background.
If you ever need to stop the Daytona server, you can do so by running:
1daytona server stop
And to start it again, simply run:
1daytona server start
Verifying the Installation
To verify that Daytona is installed and running correctly on your local machine, you can run the following command:
1daytona version
This command will display the currently installed version of Daytona, confirming that the installation was successful.
With Daytona now set up on your local machine, you're ready to move on to the next step and prepare your remote machine for use with Daytona. In the following steps, we'll guide you through the process of installing Docker on the remote machine, configuring the necessary permissions, and adding the remote machine as a target in Daytona.
Step 1: Prepare the Remote Machine
Install Docker on the remote machine if it's not already installed.
Add your user to the Docker user group by running the following command:
1sudo usermod -aG docker $USER
Set the appropriate permissions for the Docker socket by running:
1sudo chmod 666 /var/run/docker.sock
Step 2: Set Up the Target
Daytona utilizes the concept of targets, allowing you to add remote machines for deploying and managing development environments. By default, Daytona includes a Docker provider, enabling you to spin up environments on your local or remote machine inside Docker container.
Open the Daytona CLI and run
daytona server target listto view the available targets.Set a new target by running
daytona server target setand selecting the desired provider (e.g., Azure).Provide the necessary information, such as the IP address, username, and SSH key path.
Verify that the target was successfully added by running
daytona server target listagain.
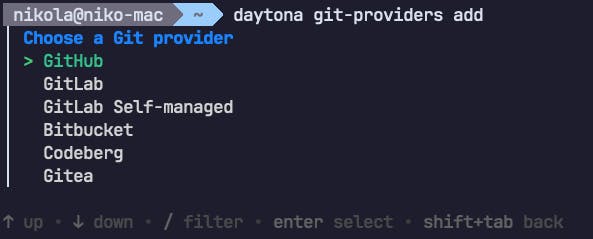
Step 3: Add Git Providers (Optional)
This step is optional since you can simply paste the public Git URL to create a workspace from it.
If you want to use your own Git repositories directly with Daytona, you need to add a Git provider. We will use GitHub, but you can use GitLab, Bitbucket, Gitea, or Codeberg. You can also check our guide on how to select Git provider.
Go to your GitHub settings and navigate to the Developer settings.
Create a personal access token with the necessary permissions (repositories access).
Add the GitHub provider to Daytona using the generated access token and command
daytona git-providers add.
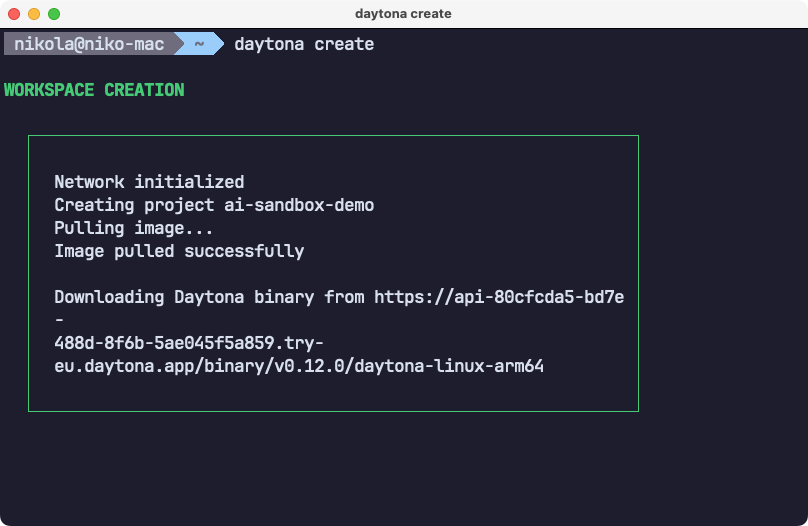
Step 4: Create a Workspace
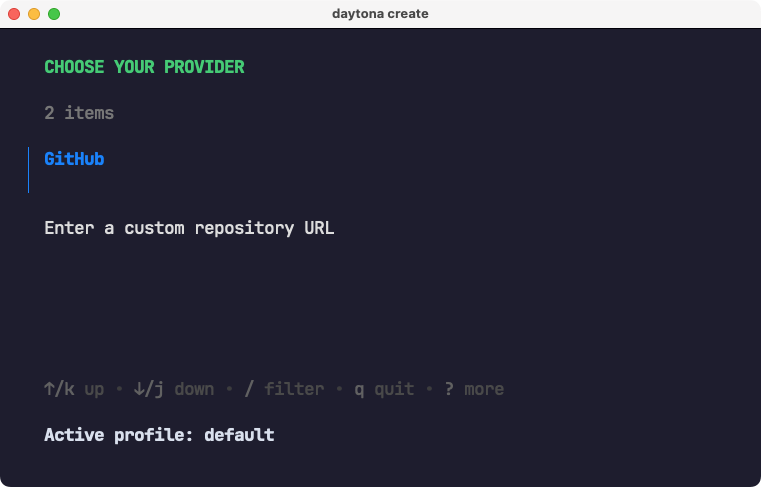
Run
daytona createto create a new workspace.Choose the desired Git repository, by pasting the repo URL or selecting it from the list of your repositories, and select the target on which you wish to run your workspace.
Wait for Daytona to pull the necessary images and set up the workspace.
Once the workspace is created, you can view it by running
daytona list.
Step 5: Open the Workspace in VS Code

Set your preferred IDE by running
daytona ideand selecting VS Code. You can also use web IDE powered by OpenVSCode or any of the JetBrains IDEs.Run
daytona codeto open the workspace in VS Code.VS Code will establish an SSH connection to the remote machine and set up the remote server.
Once the connection is established, you can start working on your files within the workspace.
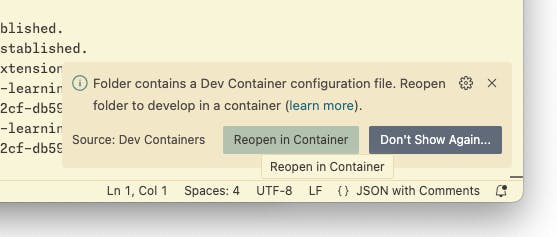
Step 6: Open the Workspace from a Development Container Specification (Optional)
If your workspace includes a dev container specification, you can rebuild the container from it.
VS Code will download the necessary images and start the container.
Once the container is running, you can access the workspace and make changes on your code.
Conclusion
Congratulations! You have successfully set up Daytona with a remote machine and created a workspace. You can now work on your projects seamlessly, whether locally or on a remote machine.
If you encounter any issues or have further questions, feel free to contact the Daytona team in our Slack or add an issue to the Daytona GitHub repository.