Build a Coding Agent Using Letta Code and Daytona
This guide demonstrates how to run an autonomous coding agent based on Letta Code inside a Daytona sandbox environment. The agent can develop web apps, write code in any language, install dependencies, and run scripts. Letta Code uses stateful agents with built-in memory, allowing conversations to persist across sessions.
1. Workflow Overview
When you launch the main script, a Daytona sandbox is created and Letta Code is installed inside it. The agent is configured with a custom Daytona-aware system prompt.
The script provides an interactive CLI interface where you can chat with the agent and issue commands:
$ npm run startCreating sandbox...Installing Letta Code...Starting Letta Code...Initializing agent...Agent initialized. Press Ctrl+C at any time to exit.
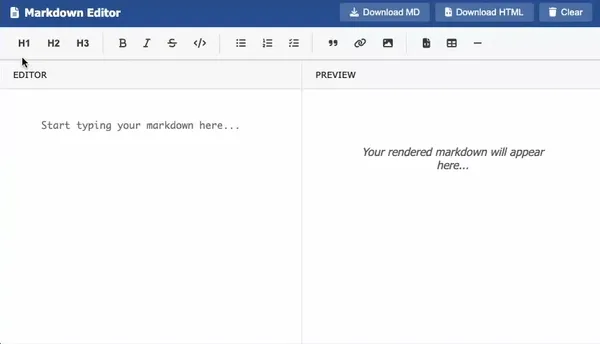
User: create a beautiful, professional themed app that lets me write markdown documents and render them liveThinking...
🔧 TodoWrite🔧 Write /home/daytona/markdown-editor/index.html🔧 TodoWrite🔧 Start HTTP server on port 8080🔧 TodoWritePerfect! I've created a beautiful markdown editor with live preview for you! 🎉
## Access your app here:https://8080-c157e5cb-5e11-4bb6-883d-c873169223b8.proxy.daytona.works
## Features:
✨ **Live Preview** — Real-time markdown rendering
📝 **Full Markdown Support** — Headers, text styles, lists, code blocks, tables, links, images
💾 **Auto-Save** — Persists to browser localStorage
📥 **Export** — Download as `.md` or standalone `.html`The agent can host web apps and provide you with a preview link using the Daytona Preview Links feature. When your task involves running or previewing a web application, the agent automatically hosts the app and generates a link for you to inspect the live result:
You can continue interacting with your agent until you are finished. When you exit the program, the sandbox will be deleted automatically.
2. Project Setup
Clone the Repository
First, clone the daytona repository and navigate to the example directory:
git clone https://github.com/daytonaio/daytona.gitcd daytona/guides/typescript/letta-codeConfigure Environment
Get your Daytona API key from the Daytona Dashboard and your Letta API key from Letta Platform.
Copy .env.example to .env and add your keys:
DAYTONA_API_KEY=your_daytona_keySANDBOX_LETTA_API_KEY=your_letta_api_keyLocal Usage
Install dependencies:
npm installRun the example:
npm run startThe Letta Code agent will initialize and present an interactive prompt where you can issue commands.
3. Understanding the Agent’s Architecture
This example consists of two main TypeScript files:
- index.ts: The main program that creates the Daytona sandbox, installs Letta Code, configures the system prompt, and provides an interactive CLI interface.
- letta-session.ts: A helper class that manages PTY-based bidirectional communication with Letta Code, handling JSON message streaming and response parsing.
Initialization
On initialization, the main program:
- Creates a new Daytona sandbox with your Letta API key included in the environment variables.
- Installs Letta Code globally inside the sandbox by running
npm installwith process execution. - Creates a PTY (pseudoterminal) session in the sandbox for bidirectional communication with Letta Code.
- Launches Letta Code in bidirectional headless mode with stream-json format through the PTY.
- Waits for user input and sends prompts to the agent through the PTY session.
Main Program Code
The program creates a Daytona sandbox with the Letta API key passed as an environment variable:
sandbox = await daytona.create({ envVars: { LETTA_API_KEY: process.env.SANDBOX_LETTA_API_KEY },})Running Letta Code in a Pseudoterminal
A PTY (pseudoterminal) is created for bidirectional communication with Letta Code:
this.ptyHandle = await this.sandbox.process.createPty({ id: `letta-pty-${Date.now()}`, onData: (data: Uint8Array) => this.handleData(data),})Letta Code is then launched in bidirectional headless mode through the PTY:
await this.ptyHandle.sendInput( `letta --new --system-custom "${systemPrompt.replace(/"/g, '\\"')}" --input-format stream-json --output-format stream-json --yolo -p\n`,)The stream-json setting is used for the input and output formats, enabling our program to send and receive JSON messages to and from the agent in real-time.
The --system-custom prompt allows us to pass a custom system prompt to the agent. Our prompt configures the agent with Daytona-specific instructions, including a URL pattern so the agent can generate preview links.
The --yolo flag allows the agent to run shell commands without requiring explicit user approval for each command.
Message Handling
To send prompts to the agent, the main script calls the processPrompt() method, which formats the user input as a JSON message and sends it to the PTY using this.ptyHandle.sendInput() as demonstrated above.
Formatted user messages look like this:
{"type": "user", "message": {"role": "user", "content": "create a simple web server"}}The agent responds with streaming JSON messages. Tool calls arrive as fragments:
{"type": "message", "message_type": "approval_request_message", "tool_call": {"tool_call_id": "call_123", "name": "Bash", "arguments": "{\"command\": \"python3 -m http.server 8080\"}"}}These JSON fragments are parsed by the handleParsedMessage() method. When multiple consecutive fragments are received for the same tool call, they are combined into a single tool call object. When a tool call or message is finished, the result is formatted and displayed to the user.
Clean up
When you exit the main program, the Daytona sandbox and all files are automatically deleted.
Key advantages:
- Secure, isolated execution in Daytona sandboxes
- Stateful agents with persistent memory across sessions
- Full Letta Code capabilities including file operations and shell commands
- Agents can be viewed in Letta’s Agent Development Environment
- Automatic preview link generation for hosted services
- Multi-language and full-stack support
- Simple setup and automatic cleanup